Category Archives: Microsoft

Watchguard – SSL VPN clients cannot resolve internal host names despite DNS servers being configured for the connection

You may find that when you configure your Watchguard XTM Firewall to accept SSL VPN connections that clients can connect to

the VPN and ping IP addresses of internal resources, however you cannot resolve internal hosts even via FQDN using DNS.  You

may also find that when you run NSLOOKUP on the SSL VPN connected client that the  result is your Internet Service Providers

DNS servers rather than the DNS servers assigned via the VPN connection.


To resolve the issue you can change your SSL VPN configuration from a “Routed VPN” to a “Bridge VPN”, the routed VPN uses a

virtual IP address pool (192.168.113.0/24) which does not match your internal IP range or the address range of the internal

DNS Servers.  When a Windows client connects to the “Routed VPN” it appears that due to the DNS server mismatch they are not

utilised by the client.


When you configure the VPN in “Bridge VPN” mode you can work around this issue, the Bridge VPN configuration allows you to

exclude some addresses from your Windows DHCP Server Pool and add the into them “Start” and “End” IP addresses on your

Watchguard SSL VPN Configuration Page. The Watchguard will now become responsible for assigning these internal IPs to VPN

clients as they connect rather than the Windows DHCP Server.


You should now find that when your SSL VPN clients connect that they are assigned an IP address and DNS server that are all

within the existing internal IP range of your network.  An NSLOOKUP should now return your internal DNS server address and

you should be able to ping hostnames and FQDNs that reside within your internal network.


Examples:

ping windowsserver

ping windowsserver.exampledomain.local


Please remember that the only down side with this configuration is that a “Bridge VPN” bridges to the “Trusted” interface,

this means that the client computer can access any internal resources that they have permissions for by default. A “Routed

VPN” allows you to offer traffic to Optional/secondary networks and gives you more control by letting you lock down access

using “Specify allowed resources”.
The Startup Process in Windows 7 – SP1 or Windows Server 2008 R2 – SP1 may be slower than expected

An issue that was identifed a few months ago is slow system startup with your Windows 7 Desktop/Laptop or Windows Server 2008 R2 Server.  This is related to a delay in the initilisation of the Microsoft Software Shadow Copy Provider (Deals with Shadow Copy, System Restore and Backup).

All is not lost as this issue can be fixed by applying the latest version of Volsnap.sys to your operating system

Currently the latest version can be found in the following Microsoft Hotfix (KB 2548124) and applies to Windows 7 and Server 2008 R2 – RTM or Service Pack 1 installs.

http://support.microsoft.com/kb/2548124

Microsoft Windows Vista – SP1 or SP2 and Microsoft Windows Server 2008 – SP1 or SP2 – How to Easily Free Up Some Disk Space

Have you started to notice that C drive is getting a little full or do you just want to have a spring clean, well you may not realise it but when you installed Service Pack 1 or Service Pack 2 onto your Windows Vista or Windows 2008 Server that Microsoft very sensibly backed up all the old system file before replacing them with new ones.

Assuming that you have had Service Pack 1 or Service Pack 2 installed for sometime without issue it may be good to know that you might be able to reclaim some disk space by dumping these obsolete system files.

Simply launch an elevated Command Prompt by right clicking “Command Prompt” and selecting “Run as administrator”.  Once you are in a command prompt simply paste in the following according to the Service Pack you are currently running:

Service Pack 1 you need to paste: VSP1CLN.EXE

Service Pack 2 you need to paste: Compcln.exe

Be patient with these commands they will need time to enumerate a large number of files and could take up to 60 minutes to complete.  Once finished I would recommend a reboot.

With these commands we are telling the operating system to remove any of the superseded service pack files.  If you do not have any files to remove it might be because someone else has already removed them or your computer/server may have already come with Service Pack 1 or Service Pack 2 pre-installed/integrated.

Microsoft Windows 7 – Service Pack 1 and Microsoft Windows Server 2008 R2 Service Pack 1 – How to Easily Free Up Some Disk Space

Have you started to notice that C drive is getting a little full or do you just want to have a spring clean, well you may not realise it but when you installed Service Pack 1 onto your lovely Windows 7 machine or Windows 2008 R2 Server that Microsoft very sensibly backed up all the old system file before replacing them with new ones.

Assuming that you have had Service Pack 1 installed for sometime without issue it may be good to know that you might be able to reclaim some disk space by dumping these obsolete system files.

Simply launch an elevated Command Prompt by right clicking “Command Prompt” and selecting “Run as administrator”.  Once you are in a command prompt simply paste in the following:

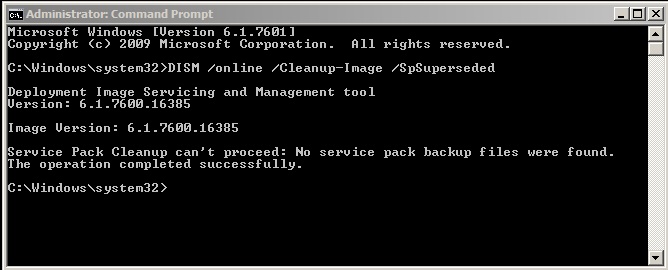
DISM /online /Cleanup-Image /SpSuperseded

Be patient with this command as it will need to enumerate a large number of files and could take up to 60 minutes to complete.  Once finished I would recommend a reboot.

Windows 7 and Server 2008 R2 all use an imaging environment to install so with this command we are launching Deployment Image Servicing and Management (DISM) and then telling it to remove any of the superseded service pack files.  If you do not have any files to remove, might be because someone else has already removed them or your computer/server may have already come with Service Pack 1 pre-installed/integrated.  In this instance you will get a message like the one below, you will also get this if you try to run the command a second time after all the old files have already been removed.