Tag Archives: “Fujitsu Siemens”

Verify the Health and Operation of your Intel® Processor with the Intel® Processor Diagnostic Tool

A 32 and 64 bit version of the IPDT or Intel Processor Diagnostic Tool can be downloaded from here: http://www.intel.com/support/processors/sb/CS-031726.htm

You can also see a video on how to use it here: http://www.youtube.com/watch?v=tpPOqh_Bq78

You can use the diagnostic tool to test the various features of your Intel Processor and perform a stress test to ensure that it is operating in a  stable manner.

Microsoft Windows based Computers and Laptops – Slow System Startup with Realtek HD Audio Chipset

You may find that Windows based computers and laptops are very slow to startup and in some instances slow to shutdown.  This has been witnessed when out dated drivers are installed for the integrted Realtek HD Audio Chipset.

The Realtek HD Audio drivers offered on Microsoft Update are often dated 2005 and are many years behind those available directly from the Audio Chipset manufacturer.

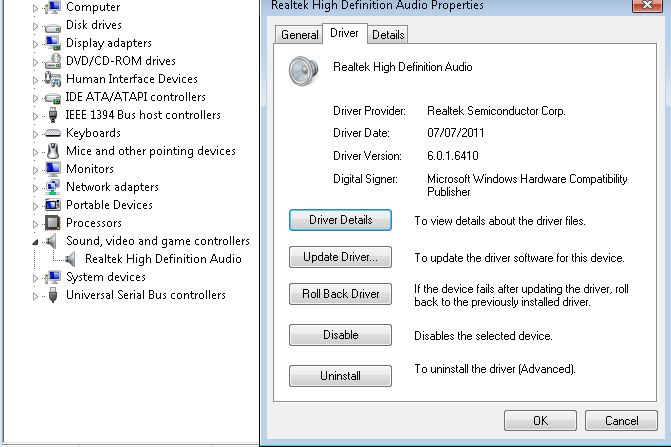
You can verify your current Audio Chipset and Driver version from “Device Manager”

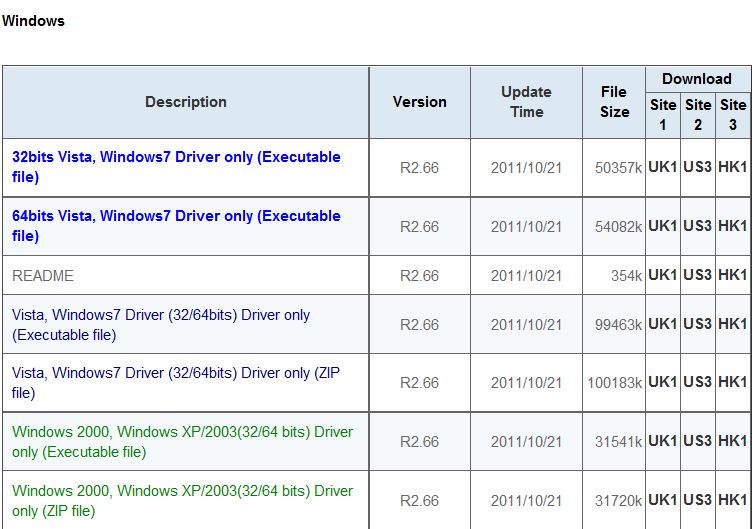
Please visit http://www.realtek.com/downloads/ to find and download the latest applicable drivers for your Windows system.  They will usually reference the drivers as “High Definition Audio Codecs (Software)” and then under Windows the list Operating System Compatability for each system and provide several download links based upon locations around the world.  Downloads from the Realtek site can be slow at busy times of the day so you may need to be patient and/or download outside peak hours.

As you can see from the table the current drivers from Realtek Support are dated 21st October 2011 and are usually updated every 1-2 months, it would be worth updating to the latest release to resolve your slow startup times and then add updating your audio drivers into your usual computer maintenance schedule.  Once you have updated remember to check Device Manager to ensure that the latest drivers are actually installed and that the device is operating correctly.

How to update Network Adapter and Wireless Adapter Drivers within Windows

You may be finding that your network or internet connection is slow or unreliable, you may also find that your computer responds far more slowly whilst you are using network resources because your network adapter drivers are not fully optimised. Wireless network adapter users may find that they cannot connect to some wireless points and/or that wireless range is not what they expect.

Any of these issues could be related to using outdated network adapter drivers so update them.

The primary types of network adapter that you will find in use today are PCI, PCI-Express or USB.  Even wireless and cabled network adapters that are integrated into a laptop or computer will still use one of these fundamental bus types.  Despite who you bought your laptop or computer from (i.e. Dell, HP, Acer, Sony) you will most likely find that a thrd party supplied the network adapter module or chip.  This is actually a good thing because it means that you are not restricted to the often outdated drivers that your system manufacturer will issues when your machine is first produced but then subsequently forget about and never update.

The process to update the drivers usually involves downloading and extracting the zipped/compressed driver file and then using Device Manager to verify and update the drivers are compatible and will install.  You will usually find that the extracted drivers folder includes an “inf” file and various “dll” files.

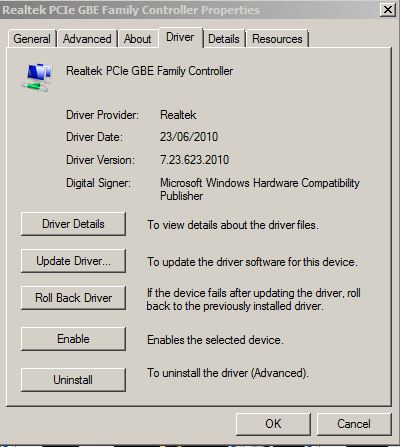
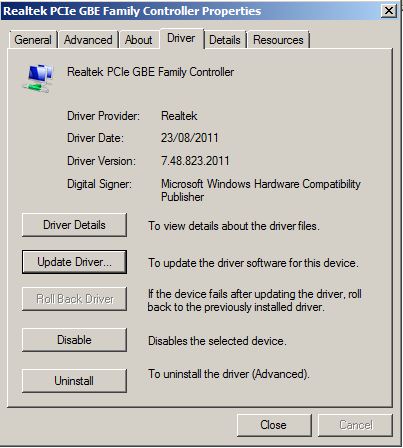
Once you have the drivers downloaded and extracted on your machine its time to launch Device Manager and find the network adapter that you wish to update the drivers for. On my example machine we want to update the Realtek PCIe Gigabit Adapter so we will double click on it and verify the current driver version.

Here we can see the driver version is “7.23.623.2010 and the date the drivers were released is “23/06/2010”.

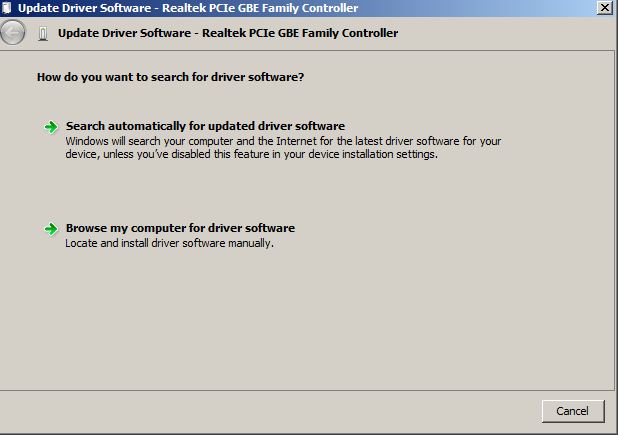
Now we want to click “Update Driver” and select the location of the new drivers that we downloaded earlier. To do this we need to click “Browse my computer for driver software” and then selecte the location of the extracted driver files.

Once we have carried out the update the new version will show along with the updated driver release date.

You will usually find that the network adapter in your computer or laptop is manufactured by one of the companies listed below, next to each manufacturer is also a link to the official driver download/support page.

Intel           http://downloadcenter.intel.com
Realtek      http://www.realtek.com.tw/downloads/
Broadcom http://www.broadcom.com/support/ethernet_nic/downloaddrivers.php
Nvidia        http://www.nvidia.co.uk/Download/index.aspx?lang=en-uk
Marvell      http://www.marvell.com/support/downloads/search.do
Ralink        http://www.ralinktech.com/en/04_support/support.php?sn=500
D-Link       http://www.d-link.co.uk/support
Netgear      http://support.netgear.com/app/
Linksys       http://homesupport.cisco.com/en-eu/support/linksys
Belkin         http://www.belkin.com/uk/support/

Fujitsu Primergy Servers – SNMP RAID and Server Health Checks

This next post is very useful for owners of Fujitsu or Fujitsu Siemens Primergy Servers, it highlights how you can monitor the status of your servers general Health and RAID Status.  To utilise these checks you will need to have the Windows SNMP Service installed and configured.  You will also need to download and install the Fujitsu ServerView RAID Manager and the Fujitsu ServerView Agent for Windows.

These OIDs can be used with your existing Server Monitoring Software such as GFI Max Remote Management or Spiceworks to provide upto the minute information.

Logical Drive Status (Array 1) = 1.3.6.1.4.1.231.2.49.1.6.2.1.10.1.1

1 = unknown, 2 = ok, 3 = degraded, 4 = offline, 5 = rebuilding, 6 = verifying, 7 = initializing, 8 = morphing, 9 = partially degraded

Logical Drive Status (Array 2) = 1.3.6.1.4.1.231.2.49.1.6.2.1.10.1.2

1 = unknown, 2 = ok, 3 = degraded, 4 = offline, 5 = rebuilding, 6 = verifying, 7 = initializing, 8 = morphing, 9 = partially degraded

If you have more than two Logical Drives (i.e. 4 x RAID 1 Sets) then simply substitute the last number of the above OID with 3 or 4, etc to reference the next Logical Drive

Number of Logical Drives = 1.3.6.1.4.1.231.2.49.1.6.1.0

1 = 1 Logical Drive, 2 = 2 Locagical Drives, 3 = 3 Locagical Drives, etc

Number of Physical Drives = 1.3.6.1.4.1.231.2.49.1.5.1.0

1 = 1 Physical Drive, 2 = 2 Physical Drives, 3 = 3 Physical Drives, etc

Power Supply Status = 1.3.6.1.4.1.231.2.10.2.2.5.11.1.1.2.0

1 = unknown, 2 = ok, 3 = degraded, 4 = critical

Temperature Sensor Ambient = 1.3.6.1.4.1.231.2.10.2.2.5.2.1.1.3.0.11

1 = unknown, 2 = sensor-disabled, 3 = ok, 4 = sensor-fail, 5 = warning-temp-warm, 6 = warning-temp-cold, 7 = critical-temp-warm, 8 = critical-temp-cold, 9 = damage-temp-warm

Temperature Sensor CPU (1) = 1.3.6.1.4.1.231.2.10.2.2.5.2.1.1.3.0.1

1 = unknown, 2 = sensor-disabled, 3 = ok, 4 = sensor-fail, 5 = warning-temp-warm, 6 = warning-temp-cold, 7 = critical-temp-warm, 8 = critical-temp-cold, 9 = damage-temp-warm

Temperature Sensor CPU (2) = 1.3.6.1.4.1.231.2.10.2.2.5.2.1.1.3.0.2

1 = unknown, 2 = sensor-disabled, 3 = ok, 4 = sensor-fail, 5 = warning-temp-warm, 6 = warning-temp-cold, 7 = critical-temp-warm, 8 = critical-temp-cold, 9 = damage-temp-warm

Please feel free to comment if you have any other useful OIDs or require further assistance